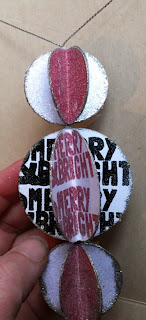
Hello all. I hope this post finds you all happy, healthy and excited about the up and coming silly season. I am! This year I decided that it was going to be a home
made Christmas theme for the tree, so the kids and I have been busy making decorations. Today I am going to show you one that I made with WOW!
 Christmas Ball Tutorial :
You will need:
12 x 2 inch plain card stock circles
6 x 3 inch plain card stock Circles
Twine
Heat gun
WOW Merry & Bright Stamp Set
WOW Neutral Ultra Shimmer Embossing Glitter
WOW Angel Wings Embossing Glitter
WOW Metallic Platinum Sparkle
WOW Black Glint Embossing Glitter
Embossing Stamp Pad
Glass of Cold Water... please be careful with heat gun
(first aid, if you get hot glue on your hand, instead of trying to pick it off and getting glue on your other fingers, pop fingers in water straight away which will set glue to get it off with out burning yourself anymore)
Method:
Cut all your circles out, I have used my cricut, but you can use punches, pre-cut or draw circles and cut.
Stamp one side with Embossing pad and them dip into embossing powder. I have made 6 x 2 inch in Angel wings and 6 x 2 inch in Neutral Shimmer Glitter.

Heat Emboss all your circles and then fold in half with the embossed side to the inside.

Collect your 6 x 3 inch circles and stamp a Christmas saying on them all. Embossing 3 with Angel wings and the other 3 with Black Glint and heat emboss.


Once embossed fold in half with the embossed image to the inside. Remember if you have used a image with a right way and a wrong way be careful to get them the right way when folding.
Once you have all your circles tip some Metallic Platinum on some paper and with a embossing pad go around the edges of the circles
Dip them into the Metallic Platinum
And heat emboss
You should now have 18 circles in total now ready to construct.
Construct ball by turning your heat gun on and make sure it is hot!
Take a piece of twine and fold in half and knot.
(this will be what the ball hangs with so make sure it is long enough. (approx 20 inches)
Make three piles of 6 circles each, even mixture of color ( 3 clear and 3 angel wings)
Apply glue to one side and then apply to the next one which is a different color.
Add the twine to the center of the two that were just glued. as below
Continue to glue until all six circles are glued together
You should have a ball that looks like this :-)
Now repeat construction again with the 3 inch circles and glue them to just above the small ones you did. Then repeat construction again with the last set of small ones. AWESOME your done :-)
The construction part looks long but I promise you it wont take long. You should have a decoration that looks like this
Right I'm off to play again, Jennifer has a great post for you tomorrow and then come back on Wednesday to see what I have made for the Christmas Table
Until then Happy Scrappin xox Donna
WOW Products used for this project
Embossing Glitter
|


Comments
Post a Comment