
November Guest Designer
Dilia Ramirez


Hello there! Dilia here again with this Christmas mixed media canvas. Below you'll find a step by step quick tutorial along with a video tutorial. Hope you all like and enjoy it! 💝 All WOW! products used are linked throughout and at the end of this post.
If you'd like to view this video tutorial please see it here:


I loved the porcelain look that the resin pieces took in my last project (see it here) so I went ahead and did the same thing to the resin pieces here. I applied WOW!'s Mixed Media Embossing Brush over the resin and heat embossed them using the WOW! Opaque Bright White embossing powder as well as Iced Teal Embossing Glitter.


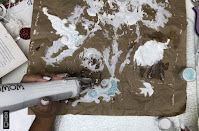
I used a piece of wood behind the canvas to give me a flat/hard surface on which to stamp the Merry Christmas sentiment. Since I knew I'd need more than one impression, I used a Stamp Positioner so that I could stamp the image as many times as was necessary in the same spot. I used the St. Valentine StazOn red color ink pad then applied a clear coat of gesso to protect it. I gave the piece of cardstock a quick brush with white gesso and white heat embossed the Foliage Background Outline stamp on it. Then I mixed in some Rosy Cheeks embossing glitter with with texture paste to add stars to my background using the Starry Night stencil then heat embossed it. I added some white Ranger crackle paste around the borders of the canvas and then used some cheese cloth under my embellishments.


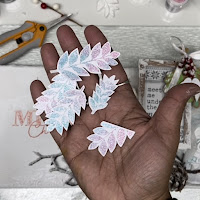
I then stamped the Foliage Background Bold stamp set onto a piece of WOW's Superior Smooth White Cardstock and used here again both the Rosy Cheeks and Iced Teal embossing glitters and heat set it. I fuzzy cut some of the foliage images and applied in random places in my project.


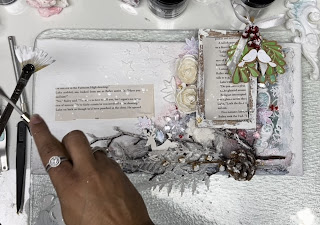
To make this project start to look cohesive, I added glue (Ranger's Multi Medium Matte) around the edges of the roses I used and in all the places I could and added WOW's White Puff embossing powder and heat set that. This gives the project look like snow fell all over the project. Before adding all the embellishments I attempted to add some purple background color but unfortunately the color turned black when I sprayed water over it and since I was unhappy with the color turnout I continued changing the color using different Finnabair sparks paints and White Titanium acrylic paint. When I was satisfied with the color outcome I began gluing all embellishments. Then covered the sentiments with a piece of paper to add white splatter using a fan brush. Since I unfortunately ended up covering most of the stars I had added previously and the project needed something some, I again added stars using the Starry Night stencil with white texture paste. The mistletoe with doves was an image I purchased from the Silhouette Design Store and diecut using my Silhouette Cameo. As the sentiment "Meet me under the mistletoe" needed something like it.


As I mentioned before please contact me with any questions, I'm more than happy to chat about crafty stuff! You can find me in social media here: YouTube, Instagram, TikTok, Etc.
Sending you lots hugs!
Dilia
Jx3 Inspirations by Dilia
SHOP HERE
Connect With Us:
Powder Arts Thermography Warehouse LTD, Caslon House, Lyon Way, St Albans, AL4 0LB
UK https://www.wowembossingpowder.co.uk/
A super piece of work Dilia and a gorgeous finished piece, thank you for the step by step photos. x
ReplyDeleteThanks so much Pat! So happy you liked it. Xoxo
Delete