
November Guest Designer
Dilia Ramirez

Hi I am Dilia of of Jx3 Inspirations by Dilia, I am Puerto Rican and live in Weymouth, Massachusetts, USA. I am super excited to be a guest designer for WOW! this month. I am married, a mother of two teenage boys and two sweet Frenchie girls. I am an Information Technology professional who loves all things crafty: painting, mixed media, jewelry making, paper quilling, woodworking, and especially cardmaking! I began dabbling in crafts in 2015 and from then on, I’ve been hooked! I love making crafty friends so feel free to reach out and say hello!

Hello again and welcome to this blog post, I have the pleasure of being WOW! Embossing's Creative Guest of the month and will start us off with the above mixed media project. I used a wide range of WOW! products on this cute project ranging from some of their powders to their versatile dual speed heat gun, super bright white cardstock and very cool mixed media brush! All products are linked or mentioned below.
If you'd like to see a video of how I put this project together I encourage you to click the link below:
Ok so let's get started! The first thing I did was assemble the photos I wanted to use on the project and gave them a thin coat of Mod Podge Gloss Lustre waterbased sealer to protect them. Using two rectangular dies of slightly different sizes taped together I created frames for my photos using the WOW! Superior Smooth White Cardstock. I cut two to three frames for each photo so they could have some dimension. I love how bright white these turned out and the paper is super soft! Can't wait to use it on some other projects! I then separated the two rectangular dies and with the larger of the two I cut out the photos and cut out a backing for each photo out of some chipboard, this way they would be plenty sturdy. Before putting these pieces together I painted the edges of the chipboard with white gesso so that I wouldn't see the beige color on the edges of the photos. I then assembled the chipboard, photo and layered frames. I played with placement and decided how I wanted to layout the photos on the project and cut out scrap pieces of cardboard so the photos would be placed in varying heights also giving them more dimension. Then the fun began!


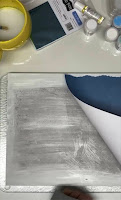
I found a 1/4" flat hard board 11 x 14 from my local craft store and decided to use that for this project, you could use whatever you prefer, a canvas, a piece of cardboard cut to size or even thick watercolor paper (if you plan on framing it). I started by coating it with white Gesso, this protects the board preventing water, paints or any media used from getting absorbed into the board. I then decided to cover the board with a piece of cardstock that had an ombre effect in blue. I already knew that I wanted my project to be in blue and green to match the photos I was using and the baby boy theme I had in mind so that one was perfect. I used a tearing tool to tear the edges of the paper, one cardstock was not big enough so I decided to use two identical cardstocks and join them in the middle of the paper where I could then mask/cover the seam with texture paste or embellishments.
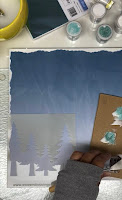
Here is where I missed a step, I should have covered the whole board and cardstock with clear Gesso to prevent the paper from warping or absorbing water or mediums but I ended up doing that a little later, I do recommend applying the clear gesso before applying anything. Instead I first used the WOW! Stencil - In the Forest to add some 3 dimensional trees with texture paste. I mixed the white texture paste with two shades of green embossing glitters Iced Teal and Icicle Teal as I wanted the trees to be lighter on the top and slightly darker in the bottom, also mixed the color Bark for the tree trunks. I applied White Puff to both shades of green to get a puffy, snowy look on the trees. Then applied the colored texture paste onto the stencil using a palette knife and the trees turned out pretty neat.

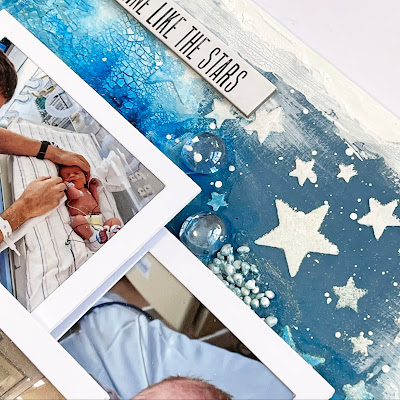
I then proceeded to add embossed stars to the top of the board using the WOW! Stencil - Starry Night with the WOW! Clear Ultra Slow Drying Embossing Pad and Powdered Snow Embossing Glitter and heat set it with the WOW! Dual Speed Heat Tool. Using this tool on this project made me realize how important it is to have two settings on a heat tool, low for places where I don't want the powder to fly out and fast to quickly dry off paint or excess water. Later in the process I decided I wanted the stars on the upper right to have more dimension so I aligned the stencil again to add texture paste but sprinkled Powdered Snow embossing glitter over the stars again.


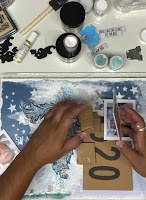
I decided on some embellishments and sentiments I wanted to apply to the project, letters for the name, and 3D resin pieces so I used several different silicone moulds I own and mixed the resin, filled the moulds and set them to dry 24 hours. Once dry I coated them with clear gesso so the paint applied to them would then stick better. I applied a black coat of paint to all but the letters, those I wanted to keep white. I diecut some onesies and heat embossed it with Pastel Blue embossing powder. Throughout the process I kept temporarily hovering the photos over the board where I wanted them placed so that I saw what surrounding area I had to play with. For the rest of the project I added more white gesso or white acrylic paint (Titanium White) around the edges and center of the board along with Ranger Texture Paste Opaque Crackle. Then decided on the placement of the embellishments and began gluing them on with Ranger Multi Medium Matte. I randomly glued on Finabair art stones. Once everything was glued on I brushed on Finabair Acrylic Paint Sparks - Magical Pond and Impasto Paint - Cobalt blue, spraying water to spread the paint over the embellishments and board. Then I dusted some WOW! Powdered Snow embossing glitter over multi medium matte glue in different parts of the embellishments and board to give it a unique touch of shine. I used black Memento ink to stamp the sentiment "I thank my lucky stars for you" from the Because of the Brave Referse Confetti stamp set and added Texture gel to the bottom of the tree trunks. Once dry I used the WOW! Mixed Media brush to apply grass and snow below the trees using Icicle Teal and White Puff embossing powder. I also used the mixed media brush to coat the baby shirt, onesie and letters using Bright White and Pastel Blue. These turned out really cool and shiny with a porcelain look to them. I glued the pictures in place using multi medium matte. Then realized I wanted more of the crackle effect so I once again added a thin layer all around the board and lightly spray painted it with cobalt blue once it had dried being careful not to wet the pictures or frames. Glued additional sentiments from Tim Holtz idea-ology Theories Quote Chips and then covered the sentiments and photos and sprayed white droplets over the entire piece with Titanium White acrylic paint using a fan brush and voila! Project Done! I placed the board in an 11x14 deep shadow frame and it's a lovely gift for the parents that I hope they enjoy for many years to come. What do you think?


Thanks for sticking with me till the end! Hope you enjoyed this project tutorial and indulged in the cutie that inspired it all. Feel free to send along any questions you may have and I'll do my best to respond to you asap.
You can also find me in social media here: YouTube, Instagram, TikTok, Etc.
Sending you lots of good wishes and hugs!
Dilia
Jx3 Inspirations by Dilia
SHOP HERE
Connect With Us:
Powder Arts Thermography Warehouse LTD, Caslon House, Lyon Way, St Albans, AL4 0LB
UK https://www.wowembossingpowder.co.uk/
Comments
Post a Comment