
Hi Crafty Friends! I am super excited to be back with you today on the WOW Embossing Powder blog! It is beginning to feel like fall in upstate NY. Today's card is inspired by the beautiful fall colors and textures all around me! So let's get started!
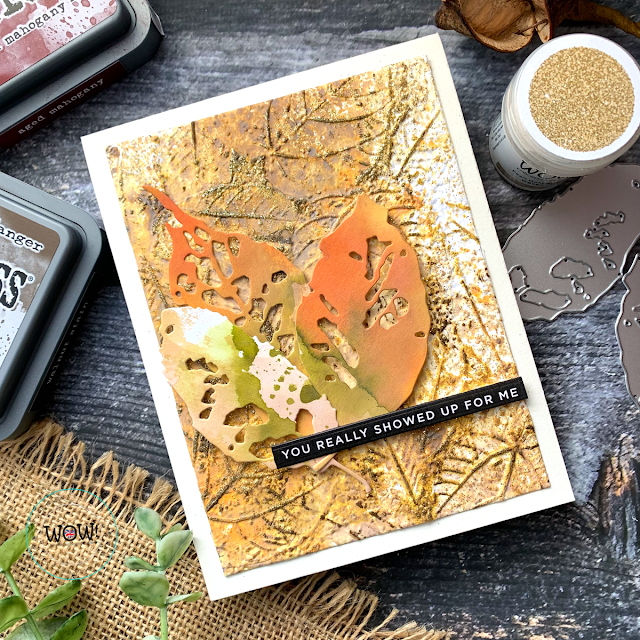
I started with a piece of mixed media card stock and an embossing folder from Tim Holtz. I love these 3D folders and the textures these folders provide on card stock! They are truly perfect for heat embossing!!!!!! For my background I chose 3 colors of Distress Oxide Sprays: Spiced Marmalade, Shabby Shutters, and Vintage Photo. I sprayed these colors directly to my folder. I then ran the folder and card stock through my die cutting machine. I then set my back ground aside to dry.
Next I started to work on the the leaves. I also started with a piece of mixed media paper and oxide inks, as well as mica sprays. I placed the color down onto my glass mat, spritzed with water, and then placed the paper into the color. I completed this several times, allowing layers of color to dry in between. I used the following distress oxide colors: Dried Marigold, Aged Mahogony, Forest Moss, Ground Espresso, Rusty Hinge, and Walnut Stain. I allowed this panel to dry before die cutting.

Once my embossed background was dry, I used distress ink in Walnut Stain to add some darker color to the raised edges from the folder. I placed my ink pad directly on the paper, gently swiping the pad on the raised edges. I let this dry, then used my WOW embossing ink pad in the same way. I applied ink in various sections of the card panel to the raised edges. I then used Pearl Gold Sparkle powder on top. I love the combination of the gold sparkle with the deep rich undertone from the distress ink. Next I die cut this panel using a rectangle die and adhered this to an A2 card base.

Next I die cut the panel I created at the beginning using leaf die cuts from Tim Holtz. I chose 3 different leaves from this set. I then adhered these to my card panel using both liquid glue and foam tape. I then chose a pre-made sentiment from my collection and adhered this with foam tape.
Thank you so much for stopping by today! I hope today's post encourages you to take out your embossing folders and to not only dry emboss them, but also heat emboss them! I can't wait to see what you make!
Crafty Hugs,
Natasha
Connect With Us:
Powder Arts Thermography Warehouse LTD, Caslon House, Lyon Way, St Albans, AL4 0LB
UK https://www.wowembossingpowder.co.uk/
This is beautiful Natasha. The 3D background and the leaves in those gorgeous autumn shades go together brilliantly. x
ReplyDelete