
Hi and welcome to the WOW! blog today!
My name is Birgit Koopsen and this is my first post as a DT-member for WOW! UK. The previous year I was on the US team where I had a wonderful time and I'm sure that will continue here! I hope I will be able to inspire you to use WOW! products in your mixed media projects and layouts and show you why they are so wonderful to work with!
Today I want to share with you a canvas that I sparkled up with hologram embossing powder and Fab Foils to create a frosty, wintery look.

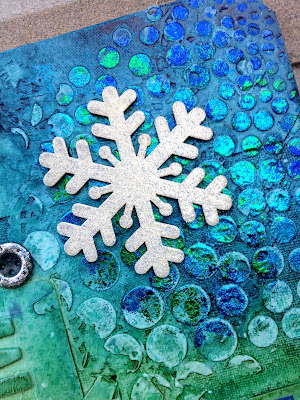
I first create the canvas by layering tags, doilies, tissue paper, lace ribbon and chipboard letters and then covered the whole with gesso. Then I added more layers using modeling paste and stencils, added some buttons and sprayed the project with a variety of Tattered Angels Glimmer Mist colours,
This is how it looked when I finished all that:

When everything was completely dry (!) I put some of the stencils back on top in the right place and filled in the open spaces with Versamark using a piece of blending foam. After removing the stencils I added WOW! Bonding Powder and heated it. I randomly added Fab Foil by laying the sheet lightly on top of the heated parts in a dabbing way and removing it quickly. This way not all the heated parts where completely covered with foil. Then I heated those parts again and added a second colour and did the same with a third colour. Re-heat as often as needed. Now the colours get mixed and create a shiny and distressed look.


I also added foils to the buttons. Since the buttons stay hot a long time after heating the bonding powder it takes a bit longer before you can remove the foil sheet. As long as the buttons (and therefor the bonding powder) are still warm the foil will not release from the sheet, so make sure to let the buttons cool down.

I took some wood veneer snow flakes and embossed them twice with Silver Hologram Sparkle. Of course you could use chipboard shapes here too.

I finished the canvas by embossing the word "love" on the tag at the right side (Love Beyond Measure - Clear Stamp Set), adding some letter stickers and crystals.


Thank you for stopping by today! Hope to see you again next time!
Happy Crafting!
Hallo Birgit,
ReplyDeletewas für eine wundervolle Arbeit. Die Farben sind fantastisch aufeinander abgestimmt. Es gefällt mir sehr gut. Eine wundervolle Arbeit. Liebe Grüße Silvi
Danke Silvi!!
DeleteA shimmering textured delight! Love how you've combined everything and still in awe of your layering skills.
ReplyDeleteNeil
Thanks Neil! :)
DeleteFab and inspiring need to find my modeling paste quick! Suex
ReplyDeleteWOW! What a beautiful canvas. Love all the texture and bright colour's you have got going on.
ReplyDeleteA fabulous first project for us Birjit - BEAUTIFUL! x
ReplyDeleteReally Great ART!! Wonderfull Birgit! I love it. Thanks for sharing! Hillie
ReplyDeleteW O W !!! this is stunning
ReplyDelete